
Worker Longshot Stefan Kit Plus Installation Guide and Review
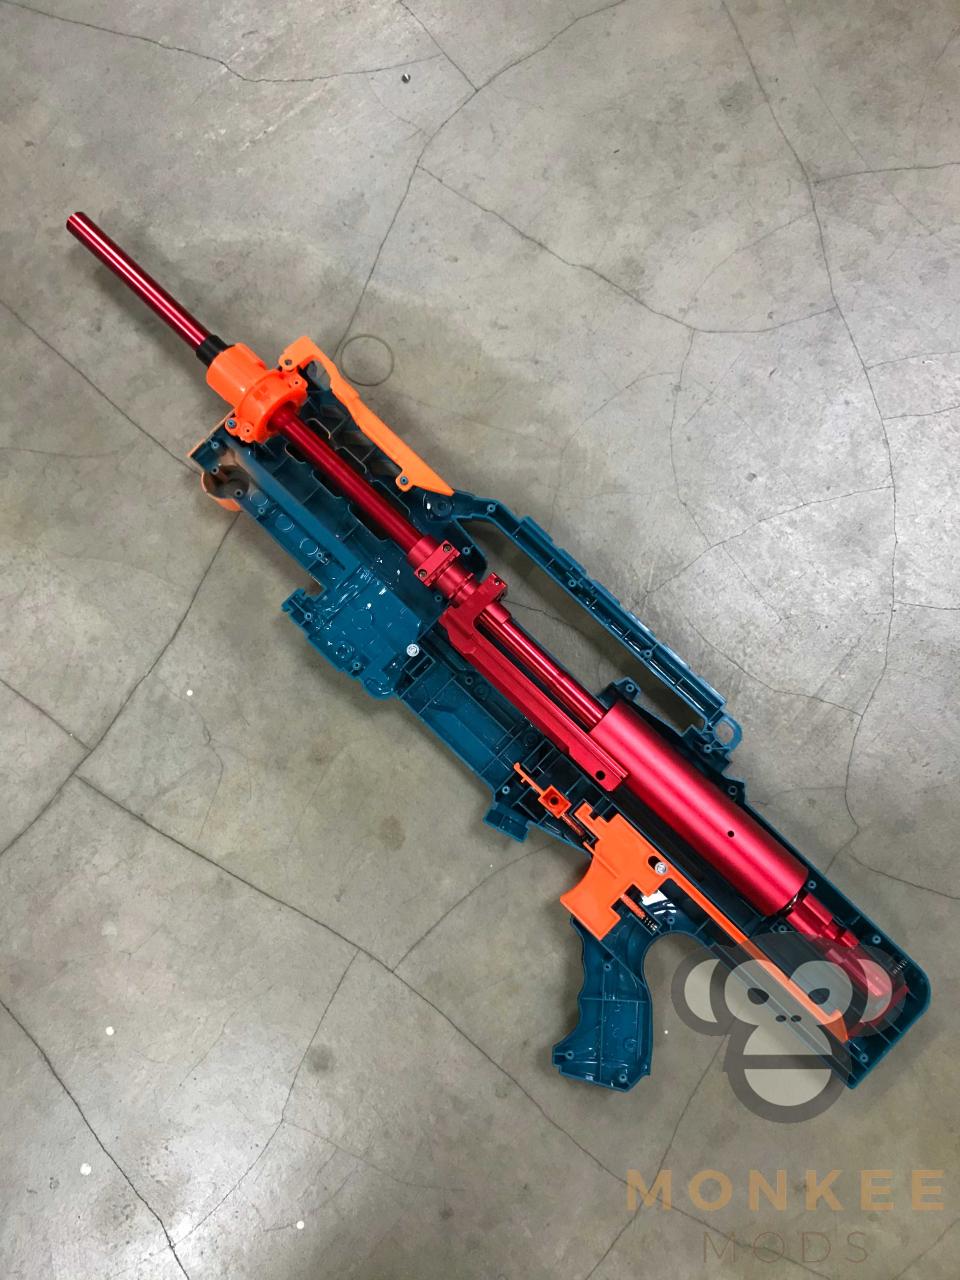
Since the release of the Worker Terminator Shell, Worker has not released any new Longshot related products. And now, Worker Longshot Stefan Kit Plus is now available! The old Worker Longshot Stefan kit has already proven itself to be a sturdy and reliable kit that packs a punch. The question is would this new kit be able to bring any additional benefits over the old system? We hope this review can provide an answer to you today.
[Update: the Worker Longshot Stefan Kit Plus is no longer sold at Monkee Mods — this 2020 post is kept as a historical installation guide and review; the USD100 price was its launch price.]
This updated plus kit comes with some interesting new parts such as a full metal plunger tube with an anti-vacuum hole, a new proprietary one-piece plunger head and plunger rod, proprietary spring stopper/guide and proprietary catch plate. This kit also comes with the standard Worker Longshot Stefan kit breech, plunger cup, dart guide/breech adaptor, and 36.8 cm barrel. These are all shown below.

Worker has made some bold claims that this new Longshot Stefan kit running the 28N prophecy spring would provide the same performance as the old longshot Stefan kit running a 22kg Worker LS spring with the benefit of having a much lighter prime with no shell cutting needed. We will be assessing each of these features in the review in order to see if these claims are true.
Installation
Firstly, lubricating the plunger cup’s o-ring is a must to do.

Next, unscrew the metal plate from the breech adaptor that acts as the tightening piece that holds the inner barrel in place.

Before inserting the inner barrel, ensure that the reamed and chamfered end with the internal groove for the o-ring is the side that goes into the breech adaptor.

Ensure that the inner barrel is placed all the way into the breech adaptor before tightening the screws and metal plate.

Lubricate the inside of the plunger tube. The plunger tube is of a lipless design that enables you to insert the plunger cup and breech into the plunger tube while it is connected to the dart pusher and bolt sled. This makes assembly/disassembly and maintenance much easier to do.

Ensure that the dart pusher is screwed into the breech tightly. Then insert the breech into the bolt sled and insert the provided retaining pin to hold the 2 pieces together.


Next, we will move onto the new spring guide/stopper. This picture shows the correct orientation of how the piece is supposed to fit into the shell. The right side with 3 metal posts would sit into the right side of the shell. A little bit of lubricant placed on the inside of the spring guide/stopper can help the smoothness of the blaster as the spring compresses inside of it.


Next, lubricate the plunger head o-rings.

This picture shows how the breach and plunger cup should be placed into in the lipless plunger tube.

While this picture shows how the plunger head/rod will be inserted into the other end alongside the spring guide/stop which replaces the end cap (mickey mouse piece) inside a standard Longshot setup

Here is the comparison of the proprietary metal catch plate that this new kit comes with to a stock longshot catch plate. You will not be able to use the stock catch plate with the new one-piece plunger head and rod.

Next, install the catch plate and spring into the same slot that the stock catch plate and spring sits in. The catch spring is quite long and may require some fiddling in order to get the spring to fit in properly and straight. It is advised to insert the catch plate in the slot first, and then proceed to push the spring into place with a small screwdriver.

This is where Worker’s claim that no shell cutting is required to install this kit is false. The shell blocks the square part of the worker longshot breach adaptor from sitting low enough, which causes the fins of the breach adaptor to not be able to fit into the provided slots in the shell. This causes alignment issues with the dart pusher and prevents the shell from closing fully.


Slight trimming is required to cut a slot that is wide enough to fit the square-shaped part of the breach adaptor. It is advised to constantly check the fitment of the breach adaptor into the shell in order to ensure that you do not trim too much material off the shell. Both sides of the shell need to be trimmed in the same way. You would know that you have trimmed enough of the shell when the breach adaptor fins sit comfortably into the provided slots and both sides of the shell can be closed properly.


We can now begin the installation of the full kit into the shell. After the catch plate and spring guide stopper has been installed correctly, insert the spring and plunger tube with the one-piece plunger head and rod in it. After that insert the plunger cup, breech, and bolt sled assembly into the plunger tube. Do ensure that the plunger tube is oriented so that the hole in the plunger tube faces to the rear in order for it to prevent vacuum loading. If it is wrongly oriented to the front you would suffer performance losses. It is recommended to have 2 people in order to assist installation as the spring is pre-compressed and the entire assembly is under constant spring pressure which might cause the internals to burst out unexpectedly (which did occur to us while installing).


Do note that the transparent outer barrel that the kit comes with is too long to fit into the shell, and would need to be cut down in order for it to be fitted into the stock orange nerf front modular adapter. Some tape may be needed in order to secure the inner barrel inside the transparent outer barrel securely. For this installation, we opted to use the artifact inner barrel holder instead which goes into the stock orange nerf front modular adaptor.


Next, push the bolt sled and breech assembly back in order to compress the spring slightly and free up a gap to install the breach adaptor into place in the shell. The entire assembly is still under constant spring pressure so it is still recommended to have 2 people to aid the installation process. One person can hold the plunger tube and spring guide/stopper in place to prevent it from bursting out of the shell, while the other installs the breach adaptor into place and ensures that the dart pusher fits into it smoothly. Once that has been done, the kit has now been fully installed into the shell.


Performance
We will be comparing the performance of this new kit to our personal longshot setup which comprises of a hybrid Worker Longshot Stefan kit breech and plunger cup, combined with the artifact breech adaptor, utilizing a 40cm Monkee Mods barrel and bolt sled, worker longshot metal plunger head, worker longshot plunger tube, artifact metal plunger cap, and the 22kg worker LS spring. Both blasters have a perfect 100% seal. Both kits are tested with ACC V2 hard tip darts.


The performance numbers for this setup can be seen below.


Average FPS = 240fps
This is the performance compared to FPS numbers achieved by the new kit.


Average FPS of the plus kit = 247fps
Therefore, worker’s claim that their new kit running the prophecy 28N spring could equal to the performance of their old kit running the 22kg spring appears to be correct. It even surpasses the performance of the old kit on average by 7fps.
Conclusions/Final thoughts
One criticism that I do have regarding this new kit is the weight of the one-piece plunger head and rod. I question the need for the double o-ring on the plunger head as the old worker kit as well as similarly modified longshots are able to achieve a perfect seal with only a single o-ring on a much narrower and lighter plunger head. The large width between the 2 o-rings adds weight and material that reduces performance as the 28N spring will have to push more mass going forward. A lighter plunger head and rod assembly may further improve its performance.
It should also be noted that some care is needed to ensure that the breech is fully pushed forward and closed all the way. This is because when closing the breech, you will need a little bit of additional force to push the dart pusher and it’s o-ring into the inner barrel to get it to seat properly in order to achieve a perfect seal. We are uncertain on why this occurs as it may just be a new o-ring that needs to be used and worn in, or perhaps the pusher o-ring may be ever so slightly larger than the dart pusher o-ring in the previous kit.
Another criticism is that the proprietary spring guide/stopper and one-piece plunger head/rod limits you to use the standard worker 28N prophecy spring only. You are not able to use standard Longshot upgrade springs with this proprietary assembly. This is because the 28N spring guides the plunger rod and it’s catch notch into the spring guide/stopper all the way to the catch plate. With a wider spring, the plunger rod would not be guided into the new spring guide/stopper. Therefore, we do not recommend this kit to people who want to use their standard high spring load longshot springs as the 28N spring gives a limitation on the performance.
Overall, the new Worker Longshot Stefan Kit Plus definitely brings new innovation to a saturated market of longshot upgrade kits. Despite my criticisms, the new one-piece plunger head and rod with double o-rings does achieve a perfect seal and the lipless plunger tube eliminates the need to remove the bolt sled and dart pusher to take out the plunger cup for maintenance (which would have needed to be done on the original longshot plunger tube design). The new spring guide/stopper is also a clever alternative to replace the end cap (mickey mouse piece) which is a common weak point in longshots alongside the small screw ports on the plunger tube, that has never been done before. The performance of this kit is also good considering how light the prime is, making rapid fire easier and less tiresome on your arms. It is recommended to pair this kit with a SCAR barrel for additional accuracy in game. If this kit combined with the metal worker longshot bolt sled and metal trigger it makes for a complete full metal internal kit that under normal use would be almost impossible to break and is guaranteed to last for a very long time. For the price of USD100 this kit is quite worth it due to the performance and reliability that it provides. I would recommend this kit to intermediate and advance players who aren’t modders that want an all in one setup that does everything without needing additional mods done.